TL;DR The UHK80 is arguably one of the most modular boards out there. It lets you swap trackballs with touch pads and trackpads on the fly. And it's arguably the most flexible keyboard I've ever had a chance to use, but it's also one of the priciest.
A Wild Split Has Appeared

I know what you're thinking. Didn't I say I was done with regular, staggered keyboards? Yes, but, behold, a wild split has appeared.
And it's more than just split. This one is also modular, on-the-fly modular, and wireless. It has a display, which I found both very useful and a little underutilized. And arguably the most tank-like tenting feet I have ever encountered, which come with their own set of caveats.
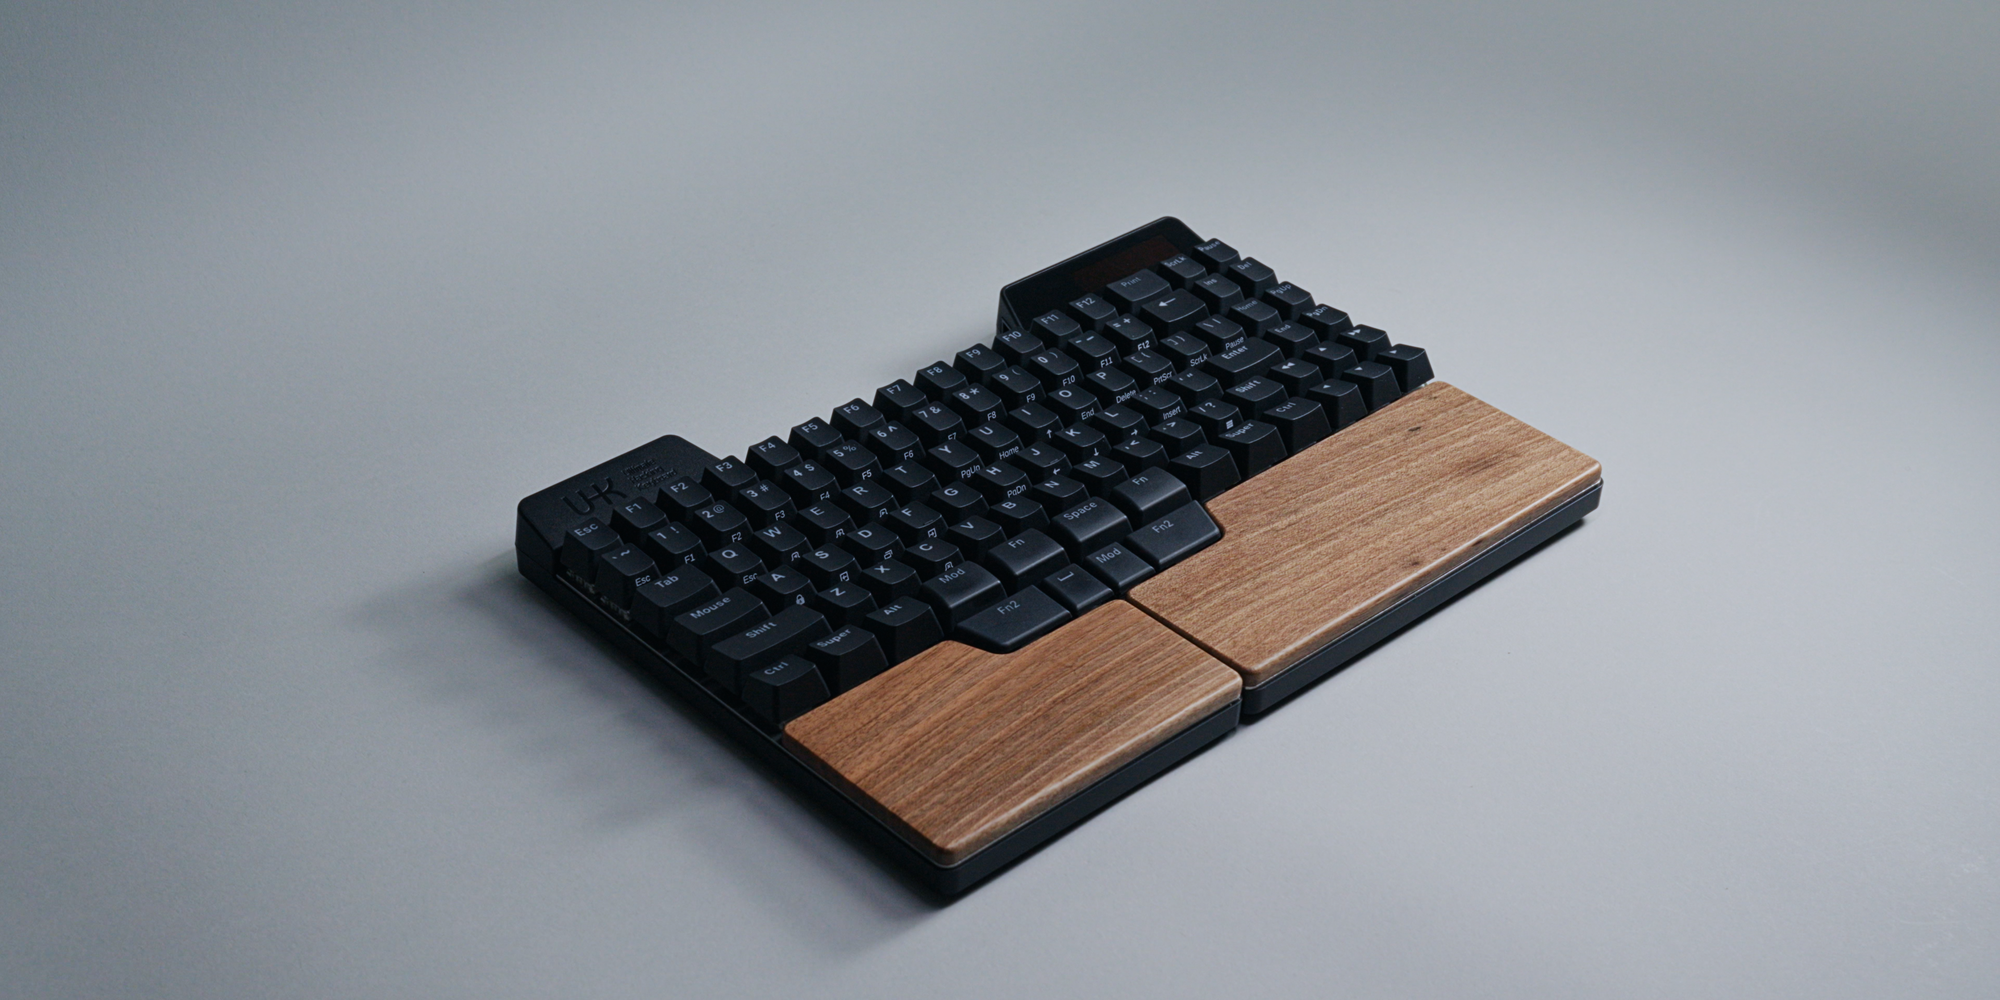
This is the Ultimate Hacking Keyboard 80, or UHK80 for short. The first keyboard ever where I had to read the manual, because I couldn't figure out how to turn it on.
Build & First Impressions
First impressions are always a tricky thing. If you ever meet me in person you're likely going to walk away wondering who put this together. Just like the Go60 coming after the Voyager, the UHK80 essentially enters the arena with me still digesting the positive experience of the previous two, and this caused an initial skewed reaction on my side.
Construction wise, it simply doesn't live up to the $462 asking price, and that's without any of the modules, tenting feet, or the battery. Yes, the battery is an additional $33 option. At first that seemed odd, but reading up on it, I actually like the approach UHK is going for here: if you don't need it, why get it? Why pay extra for something that is figuratively and literally a waste. You can add the battery later, which is surprisingly easy as it's a pretty straightforward process of removing the palm rests and then connecting it. This goes for almost all of the accessories by the way, even the dongle is an option, another $33.
The downside is that it adds up fast, and no amount of goodwill will change the fact that the hardware just doesn't match the price tag. That feeling is confirmed when looking at the exposed layers on the side and the occasional unevenness. There's also a noticeable flex in certain areas, courtesy of the all-plastic housing.
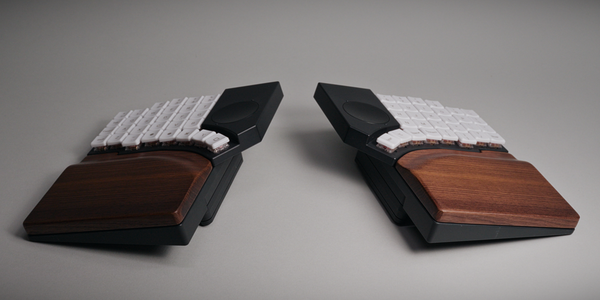
Right below the keys you'll find the permanently attached wooden palm rest, which coming from the Go60 filled me with joy, as I very much adored it there, and here too. Since it's permanently attached, there's no need to fuss about it and no extra costs. But especially compared to the Go60, it doesn't look or feel as premium. For one, the grain doesn't match up between the halves, and I'm not even sure they're from the same tree, with the right one looking just slightly darker than the left. What do I know about wood. The only time this material comes up during my day time operation is when I receive feedback regarding my performance.
Layout, Switches & Keycaps
What the hardware lacks in refinement it does, to a certain degree, make up for in flexibility. A lot of flexibility. Let's begin with the visually most striking feature: the ability to break it apart whenever you feel like it, converting it from a standard single brick into a split with virtually infinite adjustment possibilities. This isn't the first keyboard of its kind, but it's the first one I experienced. The cool thing is there's no restart required. You can just split it and continue your typing shenanigans uninterrupted.
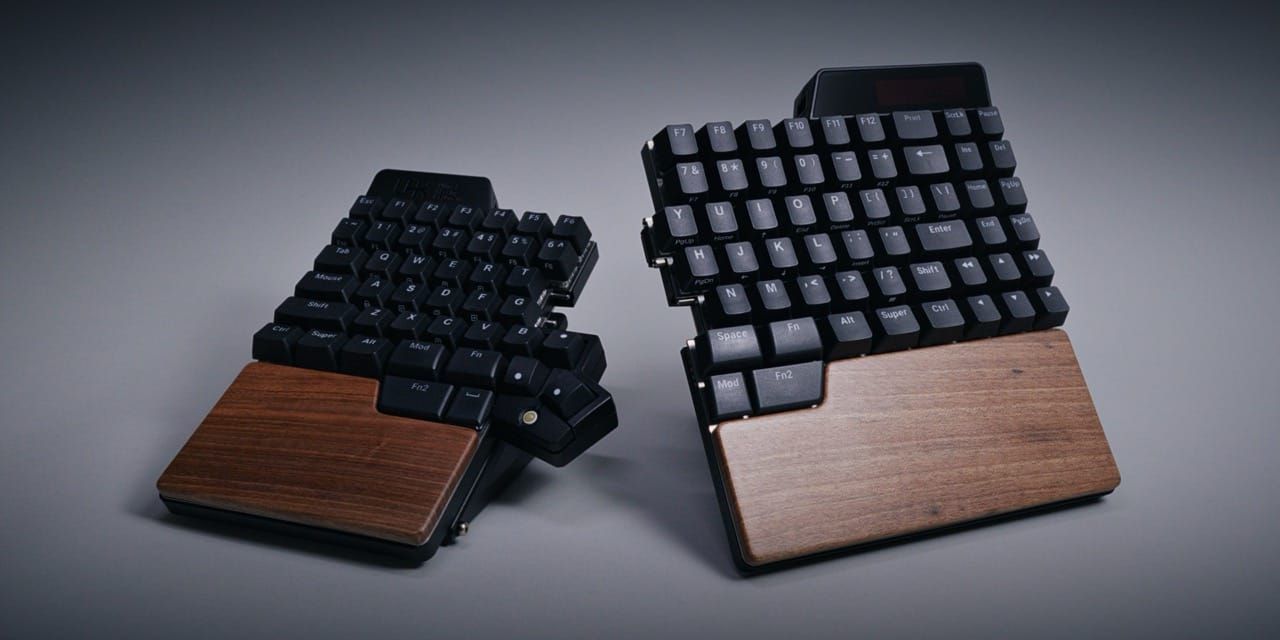
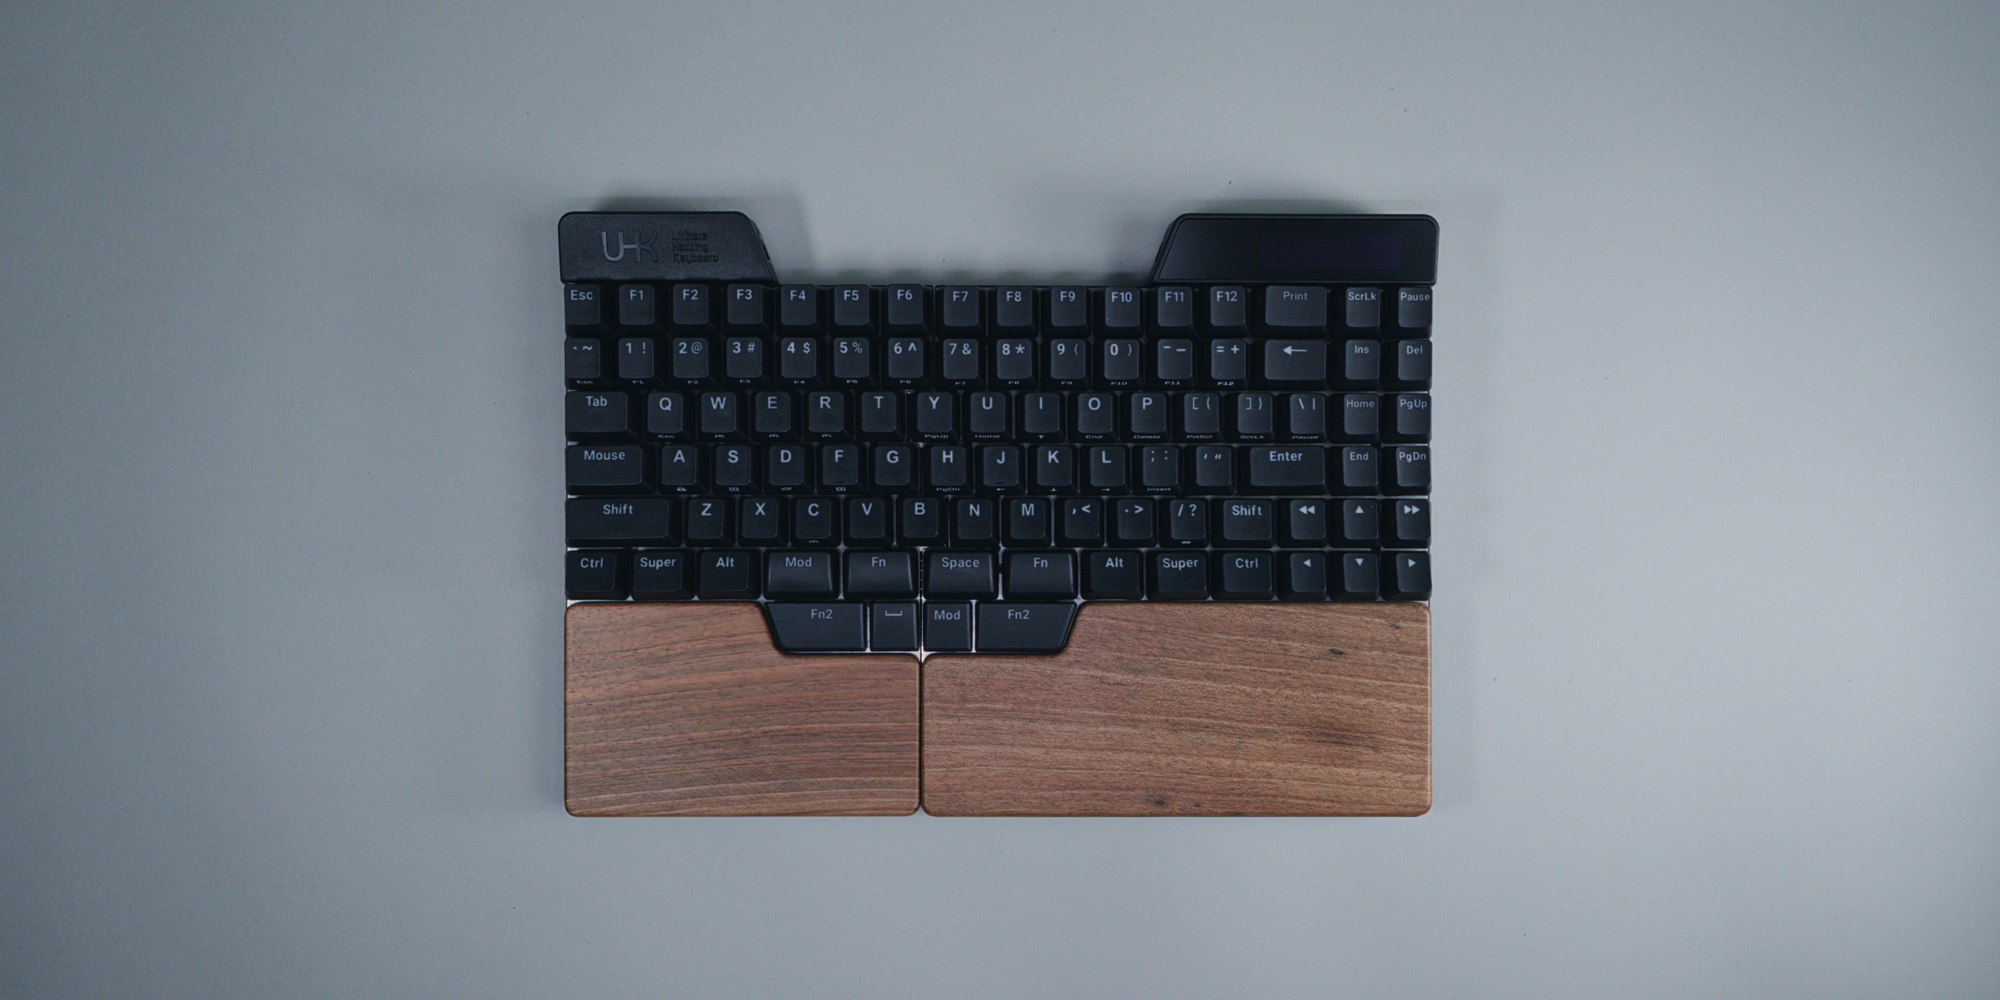
As the name suggests, this is an 80% keyboard, or TKL if you want to flex your abbreviation knowledge. Substantially larger than a Corne or the other splits that usually stay around 60% or smaller, like the Go60 or the Voyager. Meaning we have a full numbers row, a full functions row, dedicated arrow keys, and these, whatever they are called.
The board only comes in an ISO layout. There is technically an ANSI version, including caps for a number of languages, but the only difference I could spot is the left shift key, which gets split. The enter key for example will always remain in its bar shape. Since I actually prefer ISO, there wasn't much convincing needed for me, even though I am permanently installed in ANSI territory.
The other layout oddity is much less limiting, and actually adds a lot: the thumb cluster. If you're not familiar with split keyboards or non-staggered layouts, it basically refers to having a cluster of keys around your thumb area to leverage your big stubby. Most often these are used to activate various layers, which is the case here too, apart from a few exceptions. Everything can be reconfigured to do pretty much whatever you want anyway. It did however take quite a bit of time for me to get used to. Even though I come from thumb cluster heavy keyboards, the reason comes down to the 4 additional keys on the 2nd row. This additional set was a bit overwhelming for my brain to process.
What's more interesting than my token limits is that they are using Choc V2 switches there, instead of the standard MX switches the rest of the board uses. I believe this is a first for me, having 2 types of switches installed at the same time. Because both use MX stems, you technically can replace all of the keycaps with a standard set. But I'd reckon you're going to be hard pressed in finding something that doesn't end up looking like a thumb cluster afterthought.
Overall the caps are very nice though. They are level, double shot, shine through, and made of ABS. Some have side labels for their additional functionality, like the arrow keys under my right hand, which I very much approve of. The only key I am going to nitpick about is the print, because it seems to use a lighter font than the rest, for some reason. I also like the slightly rougher texture, which made typing quite an enjoyable endeavor.
The Display & Connectivity
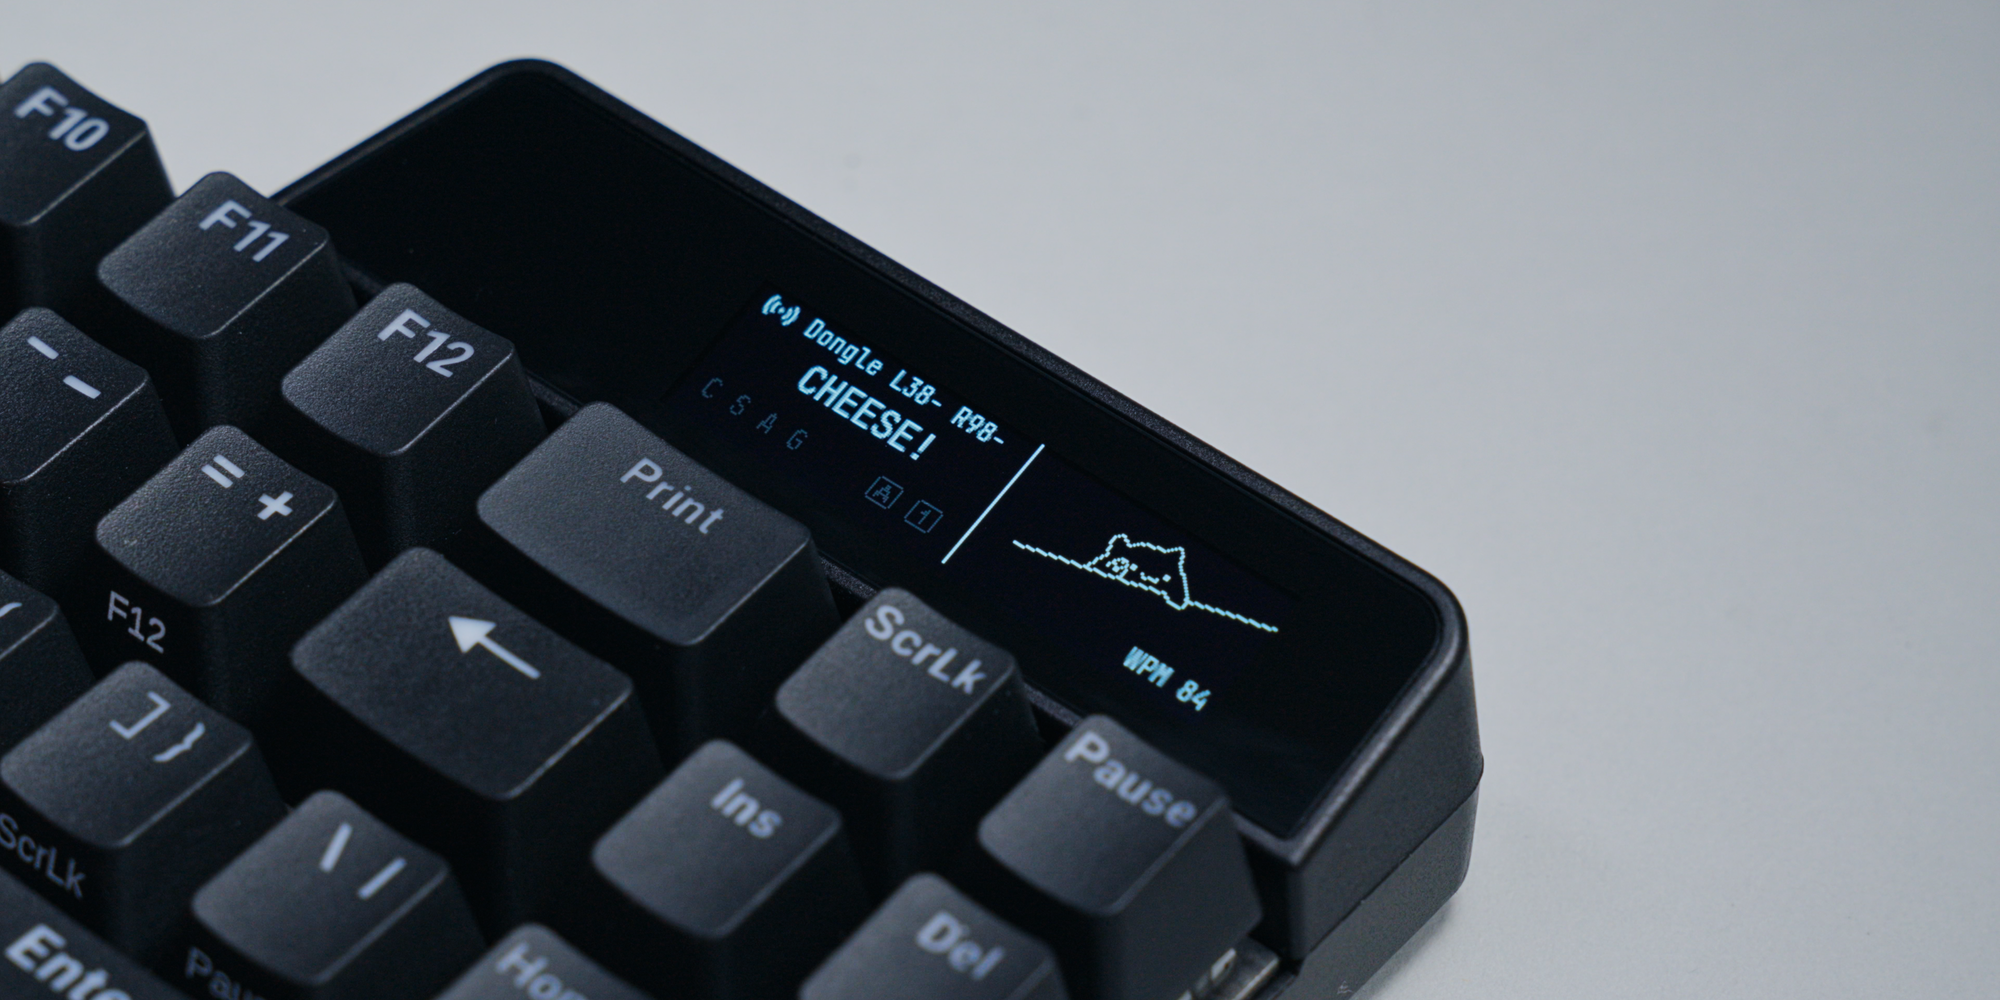
Moving to the top right we have the permanently attached display, which I ended up liking a lot, especially after a little firmware modification. It's not the first time I had a keyboard with a display. The NomadE has the infamous color screen on its side, which did a lot, maybe too much. This one is stripped down quite a bit in comparison, but therefore also easy to understand and non-distracting. It shows the battery life, charging indicator, all kinds of layer and modifier states, as well as the current profile and the connection mode, like Bluetooth.
Speaking of which, during the pairing process the screen serves as your confirmation, which it does by requiring you to enter a generated PIN code. This isn't unique. I've seen plenty of devices do this, but never on a keyboard. Like many other boards these days, the UHK80 is superbly fast at waking up the device it is paired to. There's barely a noticeable delay.
Bluetooth isn't your only option though. You can also get the mentioned dongle, which lowers the latency and noticeably improves the accuracy of the cursor when using the modules. So this might be a bit more necessary in case you plan on replacing all of your peripherals at once. Combined with Bluetooth, you'll technically be able to pair the UHK80 up with 20 devices, which is a lot. Many more connections than I am capable of making. My jealousy emotion was immediately activated.
You can of course also operate the board entirely wired, using the USB-C ports on the back. There's one for each half, though the left one is solely for charging. You will have to use it for that too, because even if you merge the halves, it won't charge. Alternatively you can use the included curly cable to bridge the halves. This way you only need one USB-C cable. It's a bit confusing, and you'll notice this because when using the board completely wireless, the left half tends to deplete faster. That's because the right half has a larger battery in order to power more keys and the display, but the balance is a bit mismatched. Maybe it's a different story if you have RGB enabled, but as I had the lights out during my entire runtime, I don't have any logs to validate this.
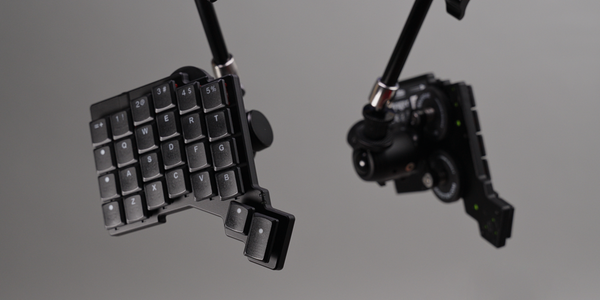
Tenting Options
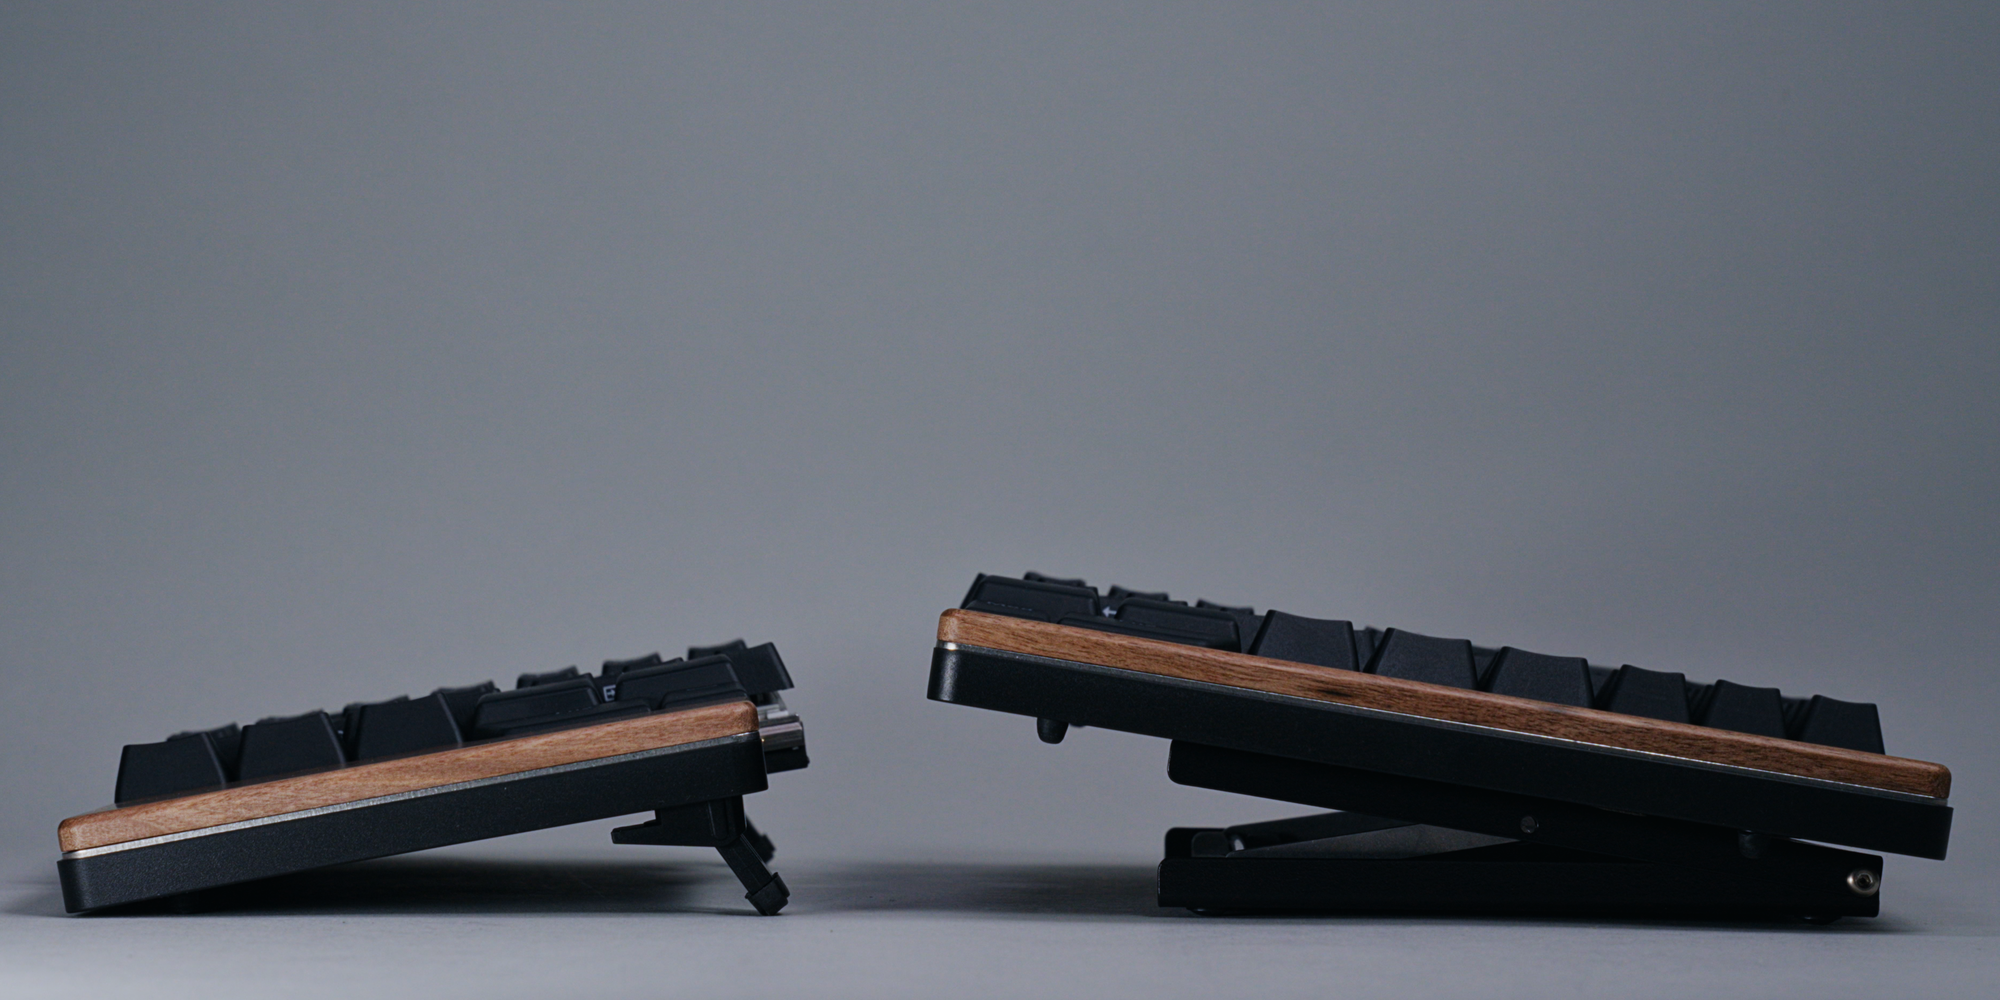
When you flip the UHK80 on its back, you'll see various mounting options. First are the 4 for the included feet, which give you the option to prop it up for 2 additional, traditional typing angles. But flexibility is its name, and you can flip them around for a negative angle, something I didn't know was a thing. Personally not for me, but what I did like was the ability to use them as tenting feet. Because of how the twist-in mechanism works, you can use these feet in all 4 directions, and I actually found the minimal tenting angle in the collapsed state to be perfect for me. It's also easy to carry and unintrusive, albeit a little easy to dislodge, as the plastic clasps can get pushed open courtesy of the strong rubber grip.
Then there's the more aggressive and costly option, the $99 Riser 80. Attaching it is unfortunately not as easy, you have to screw it to the underbelly of the UHK80 where you'll find 4 dedicated mounting holes. The good news is there's no need for a tool, as you'll have these neat little d-dap screws. The bad news is it's quite fiddly. It took me a few attempts to get them seated. This might be on me though, as this exceeds my actuator precision capabilities.
In its defense, it allows for quite granular and steep adjustments, in 5 degree intervals, from 10 to 60 degrees in particular. Once you find the right height, the setup process is very fast. You just prop it up and you're done. Still, I liked the included plastic feet more. They also didn't add any additional height to the board. The choice is yours, which is something I started to notice more and more about the UHK80: every feature seems to be optional, and for you to decide if you want it, and also how, you want it.
The Modules
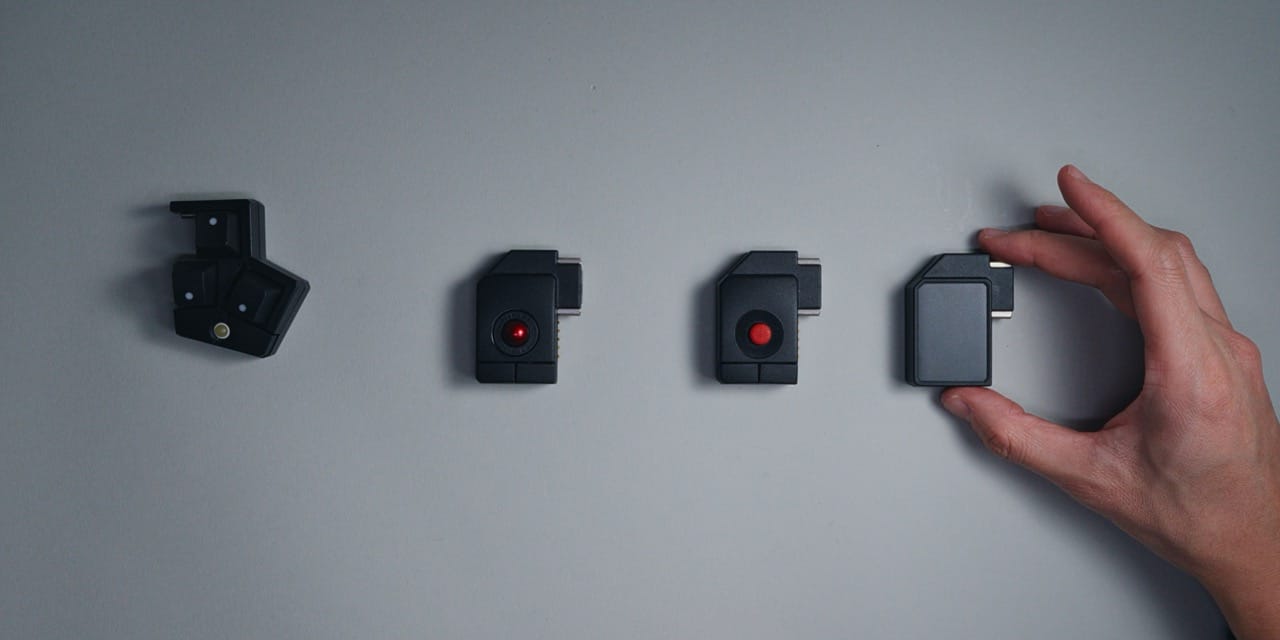
Among the unique features of the UHK80, these are likely the biggest draw, or were to me at least. Especially as a vocal supporter of having cursor input bound to your keyboard. Without going splities though, you won't actually be able to use any of these, as the connection only reveals itself once you break the board apart. It uses the same connectors as the halves themselves, which also means you can swap them out on the fly, which I liked a lot. The seating is positively satisfying, albeit a little rough if you ask me. It's definitely not on the same level as some of the more refined mechanisms out there, but it is very stable. Which is important considering you're hammering around on these, likely in a suspended position.
There are 4 in total: the key cluster, trackball, track point, and the touchpad. Each costs exactly $72 per unit.
Let's start with the key cluster, which is the only one that can go on the left. That's because of how the connectors are designed, which is a bit restrictive. Having the key cluster bound to the left wasn't an issue for me though, as the tiny, and I really mean tiny, trackball was great at scrolling, both vertically and horizontally. You can technically also scroll diagonally by deactivating the "scroll axis lock" in the settings, but it's not as smooth as on the competition. The keys can be changed to whatever you want too, including the 2 mouse-like buttons, which I've mapped to backwards and forwards, as well as the ball itself, which acts as my middle mouse click. An additional configuration change I did wasn't on a software level, but rather concerned 2 of the 3 keys. By default the corner of these was a little too sharp and would've cut into my flesh, if I had any. Luckily there's an easy fix, simply rotate them by 180 degrees. After that, the key cluster quickly became my favorite module.
Second is the trackball, which has a much more swollen ball, but likewise contains 2 buttons that by default act as your left and right click. This ball cannot be clicked, which I found a bit odd considering how small the other one is. Guess size doesn't matter after all when it comes to features. I also have a bit of an ergonomic complaint about it. You see, the key cluster module has the trackball positioned in a way that's actually reachable without me having to move my left hand. My thumb naturally ends up over it. In contrast, the big trackball is much higher up, and not within the radius of my thumb, requiring me to move just a little bit. The same goes for my index finger, but maybe my hands are just too small for this. Although according to my spec sheet I am average in every aspect of my existence. I must admit though, having 2 balls at my disposal feels superb. After having had 2 touchpads, this feels like another step towards harmony.
Less harmonically sound was the track point. For anyone who ever owned an IBM laptop in the olden days, which I can count myself to as well, this is either going to flood you with a wave of nostalgia or PTSD. Unfortunately for me, it's the latter. If you don't know what this does, it's kinda like an immovable joystick that reacts to pressure to move the cursor. I guess it's not so bad, at least it's entirely silent, which is something I can't say about the mouse buttons on any of these modules. They are, for the lack of a better word, very clicky.
Lastly we have the touchpad, which, believe it or not, has multi touch functionality. This was very surprising to me because the Go60 doesn't have this and was something people asked about frequently in the comments. How useful multi touch on a surface of this size is, depends a little on how you intend to use it. I don't really pinch and zoom, but I do value the double touch for right click a lot. The same goes for scrolling, which made me wish I could attach it to the left side. As much as I like the key cluster module, I would have loved touch on the left and ball on the right.
The perfect combination is still pending, but cluster and trackball is a pretty good start if you ask me. All of these modules can be configured just as easily and extensively as the rest of the keyboard, which brings us neatly to the software.
Software & Custom Firmware
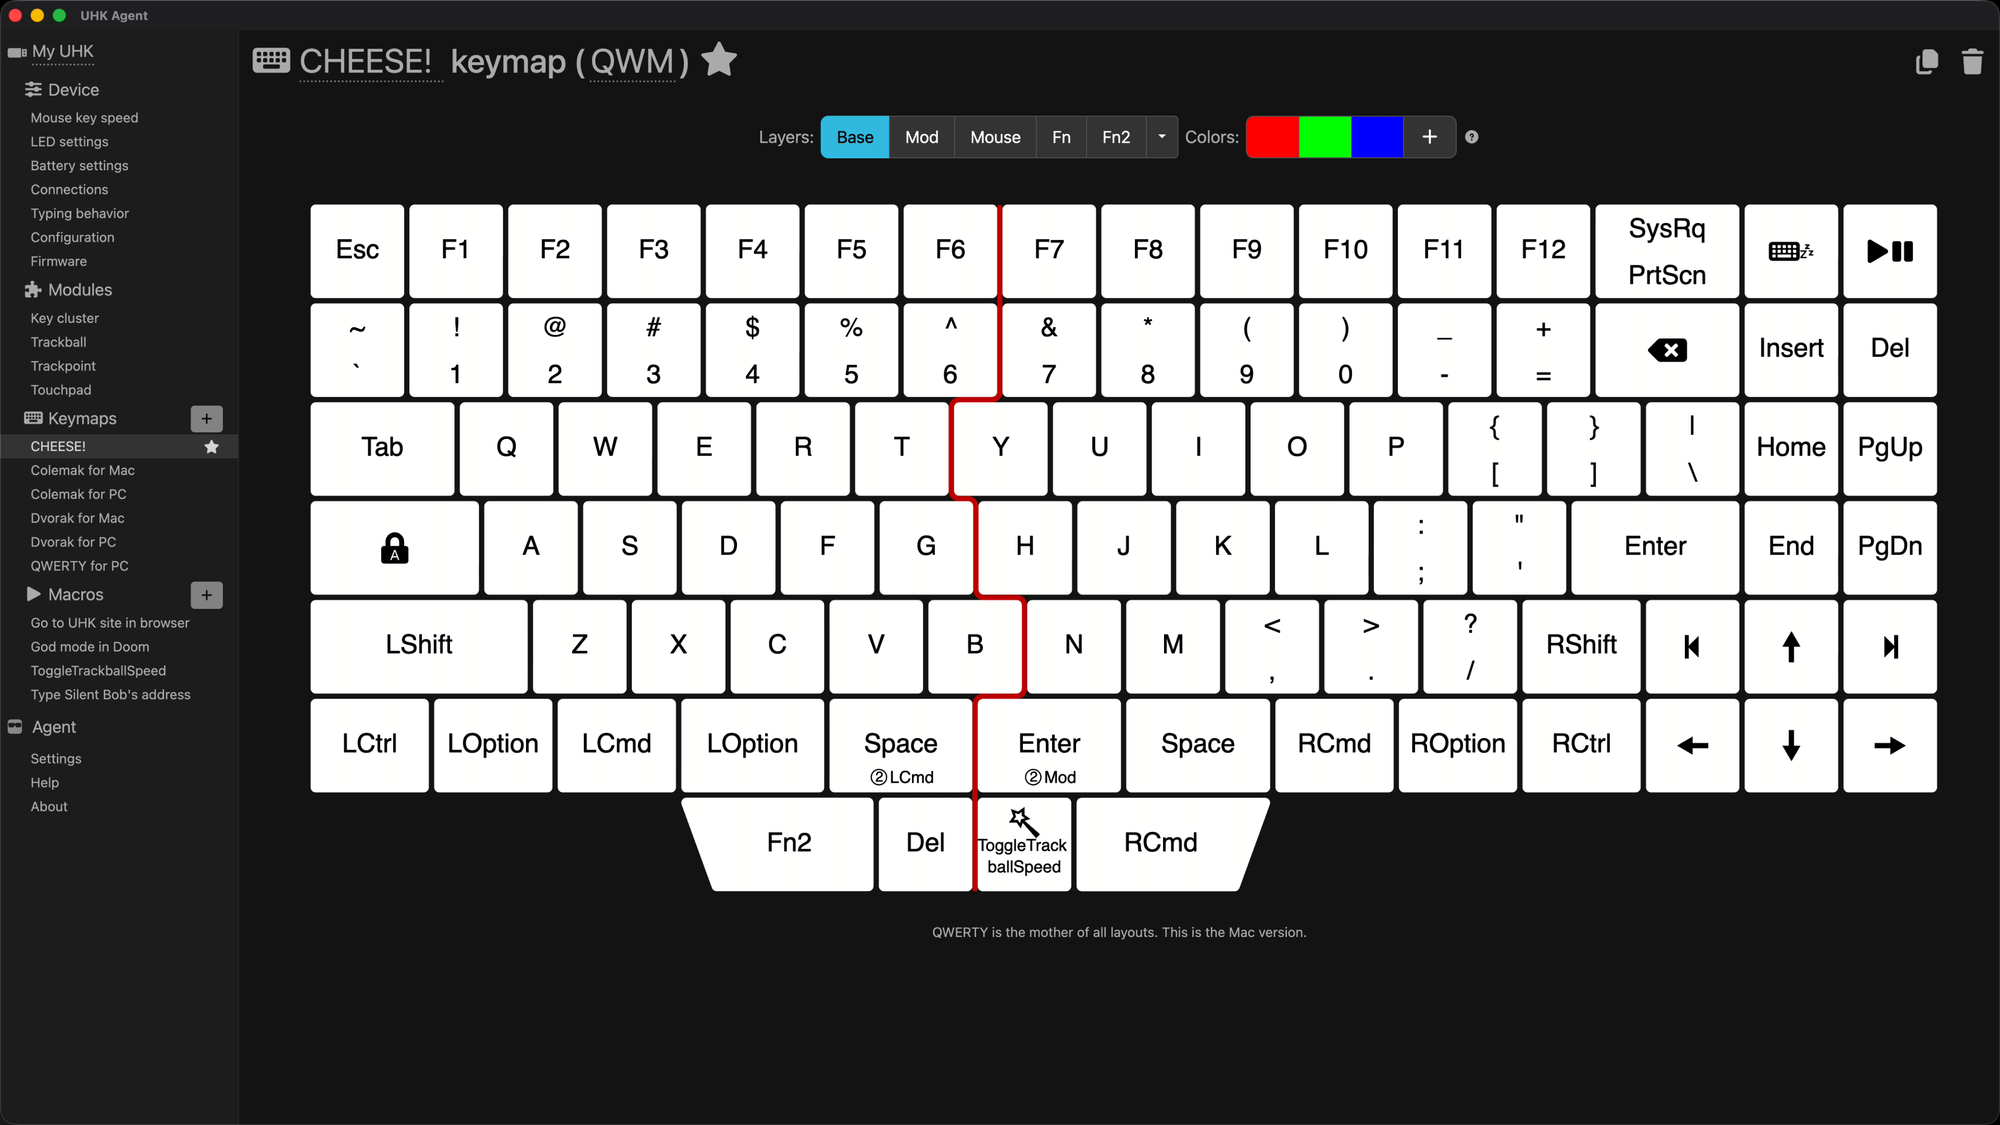
This is the part of the UHK80 I will praise the absolute most, for one simple reason: near instant flashing. I have complained a lot in my recent videos about having to compile the firmware first before being able to update my actual configuration. This isn't the case here, because it runs neither QMK nor ZMK, which are popular firmware options for a lot of these types of keyboards out there. Instead it's running on something called nRF Connect SDK, which means it also uses a different configurator, in the form of a dedicated app named UHK Agent. Like its competition though, the firmware is open source, and if you find yourself limited by the UI, the custom route is an option.
Even though the UI might seem a bit simpler at first, especially compared to Oryx or MoErgo's web editors, I believe in the simplicity lies its strength. Especially for someone like me whose keymaps don't tend to be that complex. You could say I am pretty basic. Starting out, you can pick one of the preset profiles like Colemak, Dvorak, or good old QWERTY. I also appreciate the lengthy descriptions on almost every configuration option, something that a newcomer or anyone who doesn't quite know the lingo will be thankful for. For example, I first didn't notice that the mod tap feature was called "secondary role" here. If you're not familiar with this, it refers to having two different functions bound to the same key, with tapping executing one and holding the other. I don't know why all of these keyboards have to give different names for the same function, but at least the description made me realize it was the thing I was looking for.
Another neat feature: whenever I had a new device paired to the keyboard, regardless of dongle or Bluetooth, the app would recognize this and create a profile. There's a list of all the devices you've paired with, and you can tell it to prioritize certain connections over others, if they are available. Pretty cool. Then there are the macros, which are way more than your standard keyboard combinations, although those are available too. For example, I wanted to change the trackball speed whenever I held down one of the modifier keys. And to my own surprise, I managed to get this working, including visual confirmation. Again, pretty cool.
There are dedicated sections for each of the modules dealing with settings like tracking speed, acceleration, and so on. The options are quite extensive, despite its simple appearance. One thing about the modules I do want to highlight is that you can bind the cursor behavior per module on a respective layer. This means the mini trackball of the key cluster could be configured as scrolling on one layer, and as an actual pointer device on another. This opens up a whole level of fine tuned specifics that can be quite interesting. I haven't yet found a way to incorporate this into my video editing workflow, but it is something I want to try out further.
Now let's talk about the custom firmware. Normally I wouldn't touch this. This is beyond my capabilities, but where there is a display, there's the urge to add bongo cat. I can't go into detail on how this exactly works, as it's mostly written by Claude Code. Regardless of the inner workings, if you wanted to modify the firmware yourself, you'll be happy to hear that it's pretty straightforward. It takes a while to set up due to the usual packaging chaos that comes with systems like this. Once it's running, it was a breeze to compile and flash the board. There are detailed instructions online on how to do this.
Other keyboards are capable of this too. I just never needed it until now, mostly because the basic configuration was always sufficient. But as I said, the display is alluring to play around with, and since there was no way to customize it within the software configurator, this was the only option. The flag of flexibility is waved heavily again here: the tools are given, the documentation presented, it's up to you to figure out how you want to use it. UHK assured me though, that I cannot brick the board, as the reset buttons on the back guarantee a hardware safety net, which I am very glad exists.
Tear Down
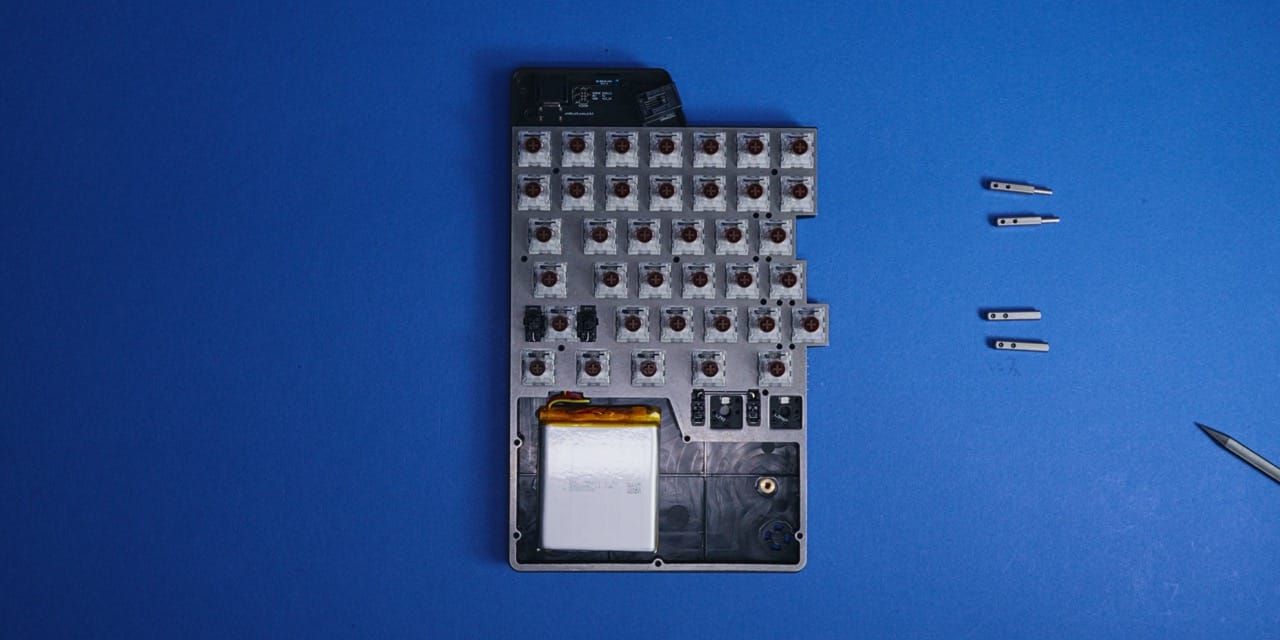
The reason I wanted to take the UHK80 apart was to confirm its easy battery replacement claim. Which also includes adding the battery later on, if you didn't purchase it initially. Now, if I had just spent 5 minutes Googling, I would have quickly learned that there's a step by step guide explaining exactly how to replace, or add, the battery. You don't need to completely dismantle the board, you can simply pry the wooden pieces off. But I instead went the "I know better" route, which usually ends up in me contributing to the global landfill. I luckily didn't break it, but since I did take it apart, and filmed it, might as well show you how it looks from the inside.
The first 2 screws I tackled were the only ones visible from the outside, holding the top compartments in place. Revealing the connector for the curly cable, and the display on the right half, along with a lot of empty space. The rest of the screws were hidden underneath the keycaps like so often, with 2 different types being present on this entire board. The shorter ones are used for the prongs that connect each half or the modules. One thing of note here: only one side of a prong is threaded. I don't want to talk about how I noticed this, or how long it took me to notice this.
The rest of the screws were all there to hold the steel plate in place. The construction is very simple. Basically the entire board is held together by the case being screwed into the plate, the switches sitting on top, and then the keycaps. It's very stripped back, and as much as I like it when things are reduced to the parts that matter, even I have to admit this feels a bit too minimal. I never really wished for an all-metal or aluminum case on a board that shipped in plastic, as most had a distinct philosophy in their choice of material. But here I think a metal case would have greatly improved the perceived value.
I didn't go further than this, as there was nothing else to discover. A bit anticlimactic, but I think in its simplicity also lies a certain beauty. For how flexible the UHK80 is, for how much you can individualize it, it's surprisingly bare bones. Putting it back together, I only had to figure out one thing: how to turn it back on.
The Verdict

I never owned a keyboard that I couldn't figure out how to power on. But when I initially unboxed the UHK80 I was just at a loss as to how to get it working. Even after multiple plugs and unplugs, it just stood dormant on my desk. That's until I realized the blinking keys were asking me to press them down, in order to unlock the board. Dumbfounded, I wondered how I could have missed this, but it's actually a good analogy for the entire experience I've had.
This is by far the most flexible board I tested. The sheer amount of options you can choose from, and the fact that your initial purchase isn't taking away anything from future expansions, is fantastic. Throughout my roughly 3 to 4 weeks of use, I continually changed and modified, both software and hardware, to fit my workflow. That might sound like I was continuously unhappy with it and needed to adjust it to finally get it the way I wanted, but I don't think that's the case. It's more like a sandbox to play around in. An exploration to get to the perfect setup. It's something other keyboards have promised, but never delivered, at least not to this extent. This truly is the modular keyboard.
But this flexibility is overshadowed by two things: the hardware, and the price. The configuration I ended up daily driving is going to set you back $639 before shipping. In its defense, I never had any issues. It pretty much always worked, no matter how often I plugged, unplugged, or attached and detached things. Only once there was a weird incident where the keys wouldn't register, but that might have been on my side, as I couldn't reproduce it. Luckily this was fixed with a reset.
Then there’s the hardware, with everything else feeling so thoughtful, it makes this part feel off in contrast. It’s similar to how you have to turn the keyboard on, the software lock is neat, but in practice I would have preferred a hardware switch, it would have felt more intentional. During the filming of the video, I also had the magnet come off for the key cluster module. This is an easy fix, but it still left me with a conflicted feeling about the whole thing.
What I will say in favor of this hardware is, it’s much more repairable, or seems at least. The construction is so simple that even if you’d loose the d-tap screws, you could simply buy any other screws to fix the Riser 80 to the board.
The UHK80 is a fascinating specimen, it can do a lot, and adapt both in software and in the physical world to your needs.
But you will have to pay the price for it, both figuratively and literally.
Mentioned Things
Pros
- It's your choice, split or no split
- Very cool modules that work great
- Display is useful and doesn't distract
- Near-instant firmware flashing (no compiling)
- Very flexible in both hardware and software
Cons
- Very pricey
- Construction doesn't match the price tag
- Left half drains faster than right (w/o RGB)
- No physical power button (yes, I would have liked this)